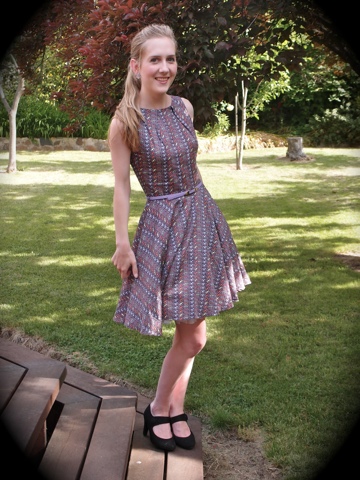
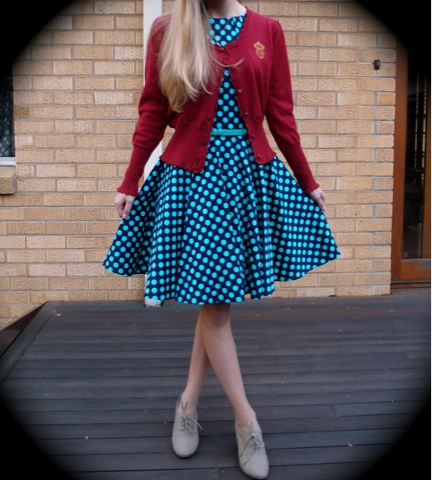
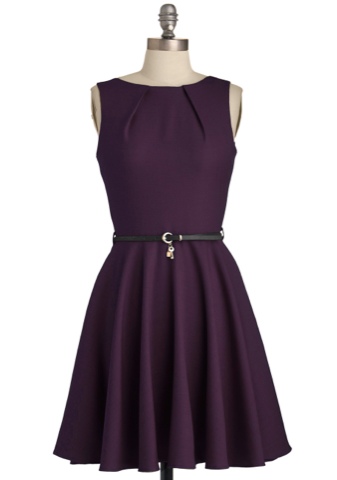
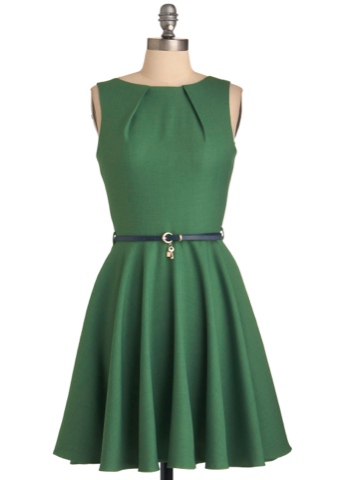
dress, sewing, WIP

WIP Weekend – Colette Hawthorn

I’m finally making the Hawthorn dress by Colette Patterns!

Here’s what I’ve done that is different and GOOD: 
I traced my pattern pieces onto butcher’s paper instead of cutting the tissue;
I’m making a TOILE you guys!

The blue flowery seersucker is what my final dress will be made from.

Here’s my toile eall cut out, it’s an old fitted sheet mum gave me for this kind of thing!  It’s got quite a pretty pink flower pattern, so if the toile works out I might keep it!  It’s only got a few paint stains on it.
dress, finished, monday, pyjamas, sewing, underpants, underwear

Monday Musings… recent makes: a disappointing dress, and a nice nightie!

The first thing I’m about to show you was a massive fail, in my opinion… please don’t judge! Scroll down for the WIN!
You all know how much I love the Luck Be A Lady dresses on Modcloth… I own far too many and they’re all amazing and I wear them almost every day.  So I wanted to make my own.  I spent ages finding a pattern and finally got one!
This is (supposed to be) New Look 6184. Here’s the pattern envelope: 
Looks like a simple dress.  It has the key feature, which is neckline pleats.  It probably is, if you use the right fabric!  You can either make it a pencil skirt or a full flared skirt.  I wanted to make a circle skirt, which was SO DUMB, why didn’t I just follow the pattern srsly.

 
My fabric… I don’t even know?  It said it was “suiting”.  This fabric has a tartan pattern on it, which is supposed to be STRAIGHT, as it is woven and not printed.  I could not get this sucker to lie straight no matter what I did!  The pattern just warped every which way.  So cutting was the first problem.

My second problem was that the iron-on interfacing wouldn’t adhere to this fabric.  As such my neck underlining keeps popping up to say hello (I managed to keep it down for the photos).

 This is the bit I’m happy with – it’s the first time I’ve used bias binding for underarms.  Even this didn’t quite work out, because the fabric also frayed like crazy making it hard to enclose the raw edge.
So I tried making a half-circle skirt instead of using the pattern pieces for the full skirt, which ended up being the dumbest thing ever.  I was trying to match up plaid and it wasn’t having it.

 Hooooly crap my darts were bad, the fabric was just SO NAUGHTY.
Aaaaaand then I cut the skirt too short while hemming.  Now it’s JUST A BIT too short to be comfortable with, and also it’s see through which I didn’t notice when I bought the fabric.

This is the most I’ve ever stuffed up anything.  I got pretty down about this, especially since I’m doing garment production at CIT and I should be good at this by now. I guess in class we only ever used calico which is extremely well-behaved, and we’ve never actually made a dress.  Nevertheless I’m pretty upset since I had such high hopes for the pattern.  Should I try again?  I think the pattern is probably fine, I just royally stuffed up!

Ok the next thing worked out very well, thank you!

The next thing I made was a nightie, because recently I’ve been wearing a really daggy singlet and shorts to bed, very unattractive.  This is the same pattern I made my undies from recently.

I made a hybrid of both petticoats, the top from view B but the body from view A.  (the difference is that view is less full, and I wanted as few seams as possible).

 This blue stretch satin monstrosity is only my toile, so don’t panic!  The satin was not stretchy enough and I didn’t have the correct type of lace, so it didn’t work out.  I learnt a lot from my toile and my actual garment turned out wonderfully:

 No you can not see me in my nightie.  This top falls to just below my bottom, so I think it will be good for summer coming up!  But recently it’s been cold so I’ve worn it with pyjama pants.

I’m so happy with how the lace turned out.  You have to stretch at the underarms and at the middle front so it doesn’t sag.

 My fabric is a lovely soft poly/cotton knit (I don’t actually fully know what’s in it, but I did the burn test and it is flammable, yaaay flammable pyjamas).  It’s got a pretty sparkle through it!

 The back is just one seam down the middle, and I find it doesn’t bother me in bed at all.
 Knitwit patterns are SO EASY!  I don’t have a stretch machine but my domestic sewing machine is working fine.  I just stretch as I sew, as it says in the instructions, so that the finished seam is still stretchy.

I still have a bunch left, so I’m going to make some more undies!  All the undies I’ve been making for myself are so much more comfortable than store-bought ones, it’s insane.  I just want to wear them all the time but I only have 2 good pairs (and one fail).  Or I could make the opposite nightie, view A bodice with view B body…
Have you ever sewn a KnitWit pattern?  So good!

modify, pattern, sewing, underwear

Make your own underpants! Pattern!

In this post you will learn how to make your own underpants from an old stretchy t-shirt (or fabric)!

I am terrible at throwing away old clothes, particularly t-shirts.  I get attached to them.  This t-shirt was a cheap buy from H&M in December 2011 (Sweden).  This is what it looked like new:
Such bright colours!  
I wore this t-shirt essentially nonstop for almost two years.  It started out fitting tight and looking flattering:
And then more recently I had to wear it tucked in…
And even more recently I began wearing it under a blouse!  But it was such a comfy fabric and a pretty design.  So when my friend lent me a pattern for underpants, I KNEW WHAT TO DO.
This is what it looked like yesterday:
Such dull colours!  And this is what it looked like today:
Undies!  Undy-chundies!  Underoos! 

You Will Need:
An old t-shirt, or some stretch cotton fabric.  PLEASE NOTE your fabric needs to be pretty thin!  A brand new t-shirt probably will not work unless it’s a super cheap thin one.  The more worn out the better.  You’ll be doing a seam on the gusset which will be annoying if it’s too thick.  
Underwear elastic.  There are three types of underwear elastic: normal (just soft elastic), lace (stretchy lace), and lace-edged (normal elastic with one edge lacy).  Pictured here is two lace elastics, and two lace-edged elastics.

This pattern:
The first two images are either half of the pattern, and the third is the entire pattern.  Print the third image on A3 or print the first two on A4 and stick them together.  I included a test square on each page to make sure you’re printing it the right size.


(Please let me know if the pattern doesn’t print the correct size, I’ll try to reupload a better size.)
Size, based on hip size (18cm below waist): 6 – 76; 8 – 81; 10 – 86; 12 – 91; 14 – 96; 16 – 101; 18 – 106. I made a pair from thick-ish jersey in a size 10, but my t-shirt fabric was super stretchy so I went for a size 8, and it fits perfectly.

There is an included seam allowance of 6mm, which is foot width!

Got it? Let’s go!
First, cut out your pattern in the correct size and lay it out on your fabric, following the grain and maximum stretch guides.  I had to unpick my entire t-shirt to get it to fit properly.  You should have three pieces: a front, a back, and a gusset lining.

Next, you need to sew in your gusset.  This is tricky.  
Place the long end of the front together with the centre back, right sides together.  They curve different ways.  Now pin the gusset “back seam” to the other side of the back.  This needs to go on the opposite way than you want it to face.  I wanted mine to be the wrong side facing up, so I put it right side up.  So the back is sandwiched between the front and the gusset.  Pin it all together, matching the centres and edges, and sew across.  Opened out, it should look like this:

Now sew down the gusset.  Pin in place on the sides and front and sew across using a zigzag or other overlock-type stitch. (Not an actual overlocker though because that’ll cut your undies in half).


 Now sew up the sides, right sides together. I also like to stitch down the seam allowance on the sides, using a zigzag stitch.
Now you should have what looks like a pair of un-elasticised underpants.  

If you have lace-edged underwear elastic, follow these instructions.  If you have lace elastic, scroll down!

To determine how much elastic you need, wrap some elastic around your waist and thighs and try to match it to how tight your actual underpants are.  That’s what I did and it worked out well!  When you pin it on, make sure you pin it around evenly, and the halfway points match, etc. Or else it’ll end up bunched up in one place.

Pin the elastic to the edge of the openings, with the lace edge on the inside, as shown:
Sew it right down the middle of the elastic, S T R E T C H I N G as much as you can as you go.  Seriously, stretch lots.  Then turn the elastic to the wrong side and sew it down again, stretching.  If you don’t stretch, when you put on your undies they’ll feel tight.
 Here’s what it looks like from the outside:
 And from the inside:
 

Now to do lace elastic, you simply pin it to the outside of the pants, and sew 2 – 3 rows of stitching, stretching as you go. You can see the two rows of stitching here:
 Once you’ve sewn it on, use some scissors to trim the fabric around the top of the lace!  Done!

And now the part we’ve all been waiting for!

 Well I’m hardly going to show you my butt am I?

 So enjoy some tights from Black Milk.

 Australian Made all round 🙂  Who knows, it might not even be my butt.

Let me know if you use this pattern and what you ended up with!  I’d love to see your creations!  
Many special thanks to my friend Veronica for getting me going on this!  I’m going to make myself another pair RIGHT NOW!
fashion, life, mod, sewing

Refashioning a big t-shirt

I know there are heaps and heaps of tutorials on how to do this online… but I thought why not add to them!
As you know, I recently went to Sydney to see They Might Be Giants.  I bought a Flood t-shirt (a great album of theirs from 1990) but unfortunately they only had mens size large.  I am not a mens size large you guys!  I bought it with the intention of modifying it (or using it as a sleeping shirt).
It is even too big to sleep in!  I can imagine myself rolling around in it and getting all twisted.  See how huge it is on me?
Let the tutorial commence.
First find a t-shirt that you DO like the fit of.  Just make sure that it doesn’t have raglan sleeves: that is, make sure the sleeves don’t join to the neckline.  This will be important later.
Iron your shirts and fold them in half lengthways.  Put your little t-shirt on top and trace around it.  Fold the sleeves inwards and trace around the curve where your armhole is.
Take away your little t-shirt and pin your big t-shirt so it doesn’t slip around.  Cut around where your drew the outline, through all 4 layers. Make sure you leave a 1.5cm seam allowance!!  Since my t-shirt was super long, I just extended the line to the bottom of the shirt – so it can be either a long shirt or a short dress.
Now open it out and pin up the sides, with the RIGHT SIDES FACING.  If you do it with the wrong sides facing you’ll end up with an inside-out looking tshirt.  Sew up the side seams but don’t sew up the armholes!

Try it on for size.  I was really happy with how this fit so I proceeded.  If you’re not happy, take it in a little more.  If it’s too small, you can still unpick and sew closer to the edges.
 Yay it fits!

Now sleeves.  Take your small t-shirt sleeve and lay it on top of your big one, matching the edges together.  Trace and cut (leaving a seam allowance).

 You should get something that looks like this.  Turn them inside out and sew up the shortest edge.
Here’s the hardest bit.  Now turn your sleeve right-side out and your t-shirt inside out.  Put the sleeve INSIDE the t-shirt, matching the side seam of the shirt with the seam you just sewed on the sleeve.  The raw edges should match up.
 Pin it in place… it should look like this.  Complicated right?  It takes a few goes before you really understand what’s going on!

Sew around your armholes!  It took me a while to make the sleeves actually fit into the armholes, they kept being too big or small!  I had to adjust the size of the sleeves quite a bit.  But finally it worked!
Yay a dress!  Or a nightie?  I’m not sure if I’ll wear this out but I love it to bits!
sewing

I bought an Overlocker!

I swear I didn’t go to Lincraft intending to buy an overlocker.  But then there was this Toyota “differential feeder” on mega-sale and I thought why not! Overlockers seem like super fun!

 Here’s all the stuff that came in the box: three warranties, a manual, pedal, cover, and packet of some bits and bobs.

 It came threaded so of course I went ahead and did some overlocking!

 There’s a threading diagram on the inside.  This is not nearly as difficult to thread as the ones at CIT (no tubes to thread through thank goodness).  However, I am having some issues with it.  A few times it would stop catching the bottom thread mid-seam and just sew nothing.  Each time I re-threaded it and it started again for a while.  I *think* I identified where I was threading it wrong, but if this keeps happening I’m going to have to call up the 1800 number.  

Each time I re-threaded this it took about 15 minutes… it’s hard threading an overlocker!  You need long tweezers to get the thread where it needs to go.  I’ve already broken both needles, so at least I now know how to change them!  I am having fun but it hasn’t been all smooth sailing… we’re going to have to work at this relationship!