
For the past couple of months I’ve been working hard to publish three blog posts every week, on Mondays, Wednesdays, and Fridays. I wonder if anyone noticed! The past few weeks it’s been super hard to do! Teaching is back in full swing and I’ve run out of scheduled posts. I’ll keep trying but sometimes I just can’t quite do it.
But here’s what’s been happening with me!
Today was Charles’ birthday! He’s now 27. I gave him a PS3 for his birthday about a week ago, so I made a birthday cake with an icing PS3 controller on it. It was really delicious and photos to come! Tomorrow is the family lunch for his birthday.
This past week I’ve been feeling randomly sick, and it’s gotten me down a lot. It makes me feel so weak and stupid when I have to go to bed early or come home from work sick. My confidence and self worth are closely tied to me achieving at my job (teaching percussion) and feeling healthy. So I just feel like the suckiest person right now.
But something good – it’s autumn! I think I like autumn best of all, because it’s such a blessed relief after the hot summer. I love cold nights, perfect for snuggling down with a doona.
So maybe I’ll post less, or maybe I’ll just post easier things sometimes! We’ll see, but my blog will live on anyway 🙂
Author: christinahopgood
My new courses at CIT!
So this semester I’ve started two courses at CIT (Canberra Institute of Technology) as part of a Certificate IV in Clothing Production. Since I’m only doing it part time, two evenings a week, I’ll be doing my Cert4 for about three years! Full time students finish in one year. But I’ve got to pay the bills (which I now have, living in an actual rented house)!
The two courses I’m doing this term are Fibres and Fabrics, and Clothing Production 1. We started three weeks ago now.
In our fibres course, we learn about different types of fabrics, what they are made of, and their qualities. We also learn about the production of fibres and fabrics. Last week we all had to present some research on any natural fibre of our choice (I chose cashmere), and it was really interesting. That session was great because I got to learn about bamboo, angora, abaca, jute, hemp, ramie, mohair, and more. I’d never even heard of abaca or ramie! I also learnt that just because something is from a “natural” source (plant or animal), does not mean it’s environmentally friendly or cruelty-free. Bamboo is a good example – it’s very renewable because it grows so fast and in such quantities, but to make soft delicate bamboo fabric they use harsh chemicals which are very damaging to the environment. The same is true for cotton. And there was a lot of talk about cruelty to Merino sheep, which I had no idea about. We need to think about where our clothing comes from if we want to be environmentally responsible. It doesn’t just appear in the shop! Does anyone remember that song from Sesame Street, Bert’s Blanket? That’s what this class was like.
Also last week, we did some felting with unspun wool! I thought I’d put up a tutorial on how to do that when I’ve done some at home. I don’t want to be a felter, because I don’t really like the results, but I’ll do some experiments and see if I can do something good.
In Clothing Production 1, we have been learning how to operate the big industrial sewing machines. We’ve only had two classes and the first was entirely talking about OH&S, like don’t put pins in your mouth, tie your hair back, etc. There were so many horror stories about people swallowing pins and getting scalped by the machines and it was scary! This week we actually did some sewing – on practice sheets, but at least we got to do it! The industrial machines are quite different from your home machine. They do one thing – go in a straight line. Fast. They are SO fast! The teacher gave the analogy of going from driving a Barina to driving a tank. They’re pure guts! The sewing we did was all in straight lines to get used to the speed and how to stop without massively overshooting. I think we’re doing practice stuff for a few weeks before we get to start on real fabric.
Otherwise in my life, I’ve started reading Overdressed, because I saw some other sewers talking about it on their blogs, and I have a (bad? good?) feeling that it’s going to drastically change my shopping habits!
And that’s what’s going on! It’s also why I’m so crazy busy! But I got some yarn in the mail today from Bendigo Woollen Mills (it feels so nice and smooth, it’s going to be so nice to knit with) and I’m going to start a new cardigan – because that’s what I like to make and wear!
A couple of outfits from this weekend
So you know how I wrote about wanting to make my own Luck be a Lady Dress using my own dress as a pattern? I started unpicking and immediately got way too scared and stopped. And then I saw the green and purple ones come back into stock on Modcloth, so…


Cardigan: Can’t remember, Valleygirl maybe? 1000 years old.
Shoes: Big W
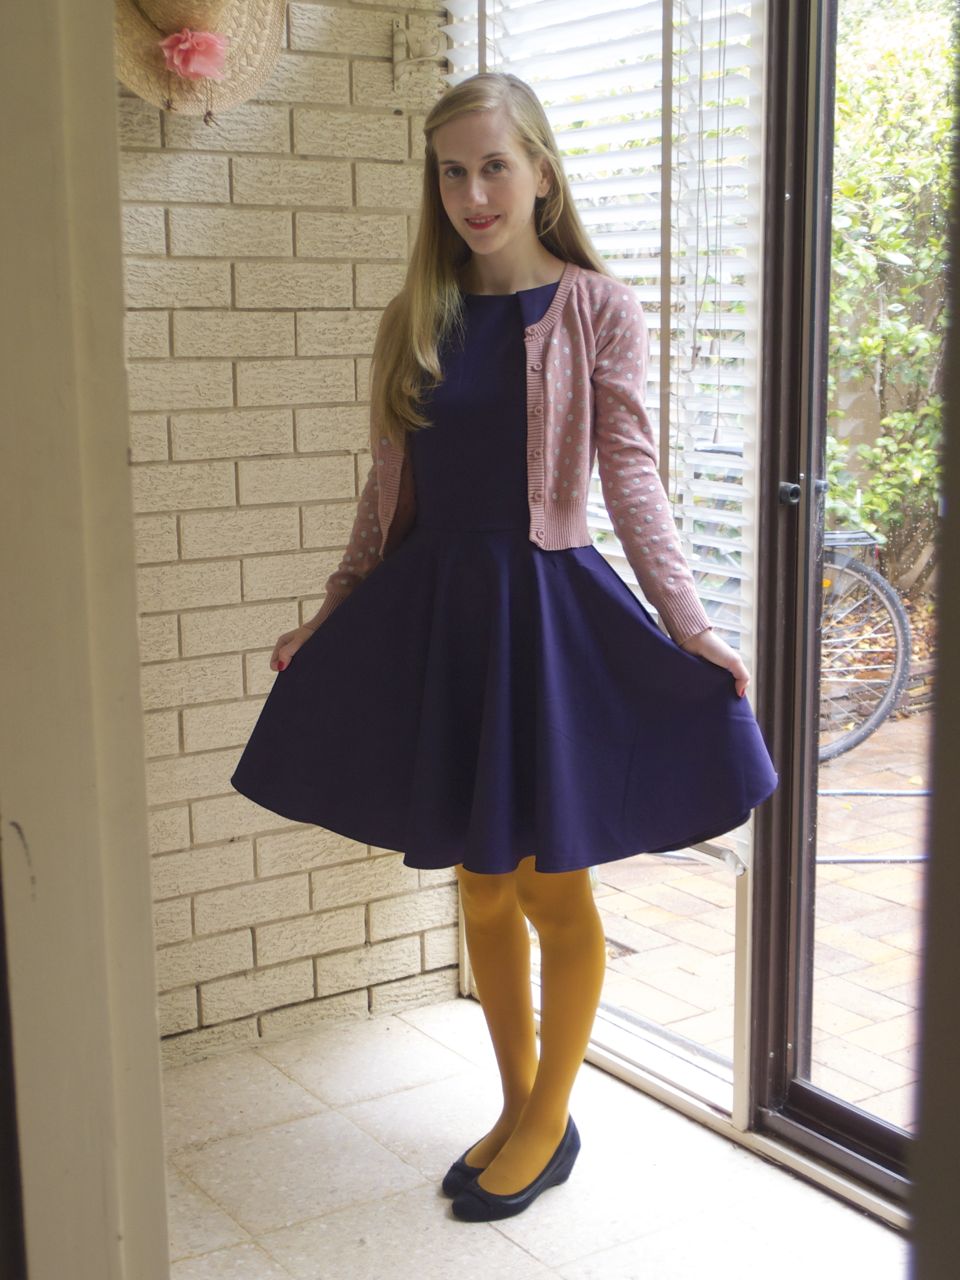

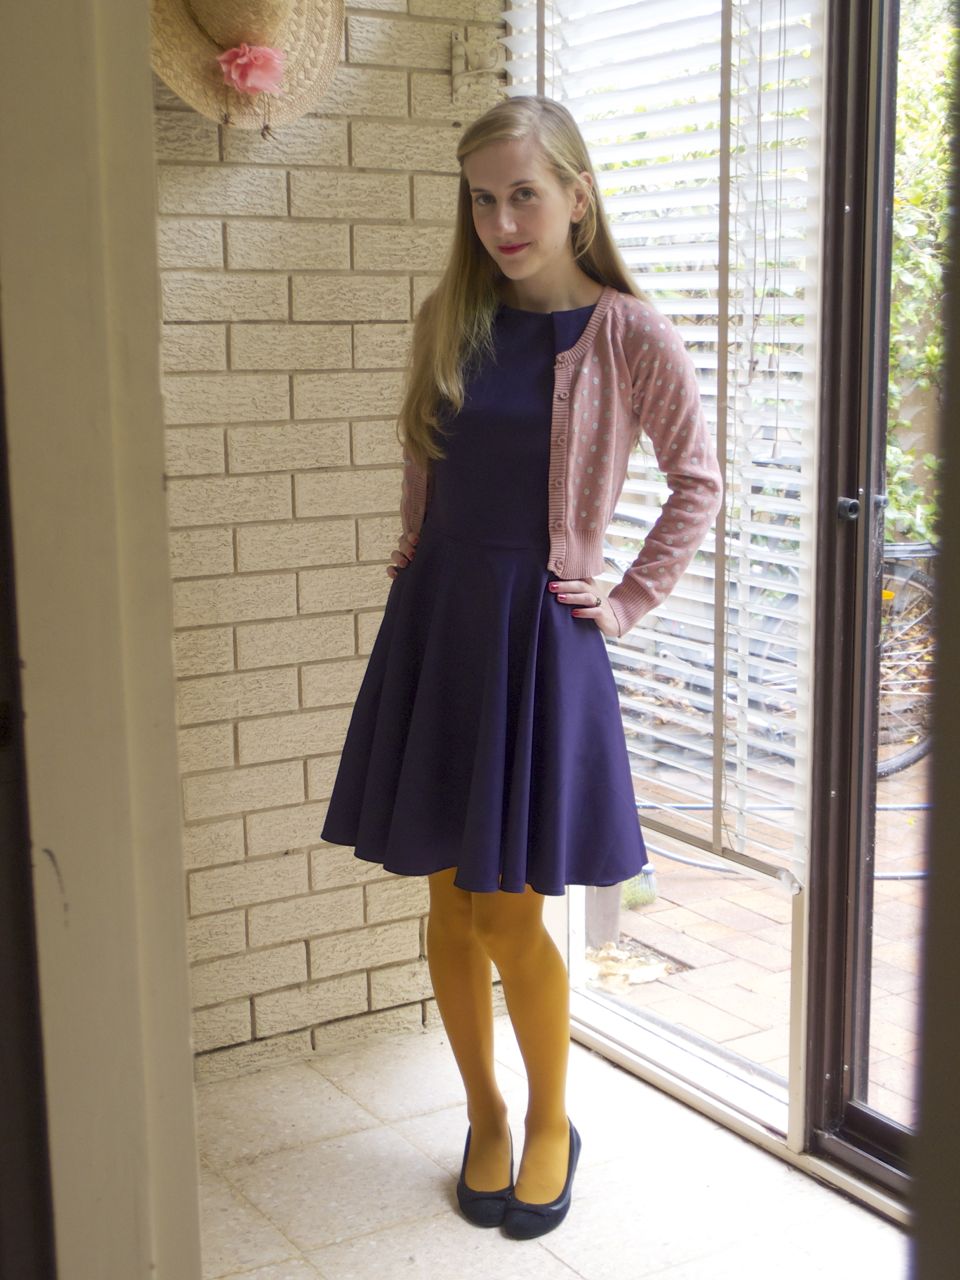
Luck Be A Lady Dress in Violet
Cardigan also from Modcloth but not on the site anymore
Tights for Every Occasion in Mustard
I’m pretty much entirely dressed by Modcloth these days. It seems like they’re the only dresses I really love and wear all the time, I guess because I agonised over them on the website for weeks before purchasing anything. My dresses that I bought in shops are often really cute in the shop, but then when they’re home I think “Huh. Why did I buy this?”
In this weekend’s Canberra Times, my lovely green Luck Be A Lady dress was in the fashion segment! I was like “What I’ve only had this dress for ONE DAY and already everyone knows where I got it.” But I love my two new dresses, they fit perfectly and because they’re solids I can wear more interesting accessories with them!
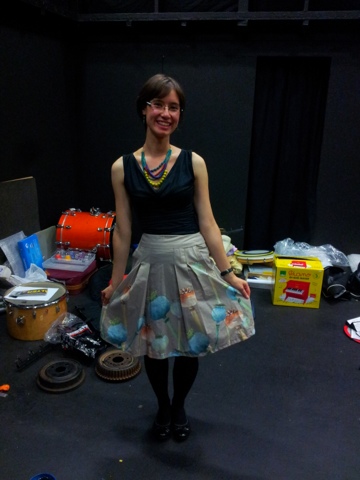
Anna skirt complete!
Just a quick post – I finished my skirt for my friend Anna, it fits, and she likes it!
It was challenging working on this skirt because its so different to the style I usually make and wear. It had set-in pockets, a back zip, a border print, pleats, and a lower waistband than I’m used to. But Anna liked it and she looked lovely. She’s moved back to Melbourne now after her Honours year here in canberra, and I’m missing her friendship!
Simple knitted beanie(s) pattern!
Scroll down for the pattern!
I just finished knitting a beanie from the leftover yarn from my Miette cardigan. I don’t know if I’d actually *wear* it with the cardigan, since it’s all a bit matchy-matchy but I love it! I’m going to wear it a lot in winter, so comfy and warm.

But this is actually the FIFTH TIME I’ve made this pattern. Firstly I made a dark burgundy one for my good friend who went through chemo and needed a hat. She loved it so much and wore it almost every day of her bald period, and I knitted her another one in white too. She wore the white one for “good”.

The red hat before I gave it away. Yes I’m wearing a mens flanny.
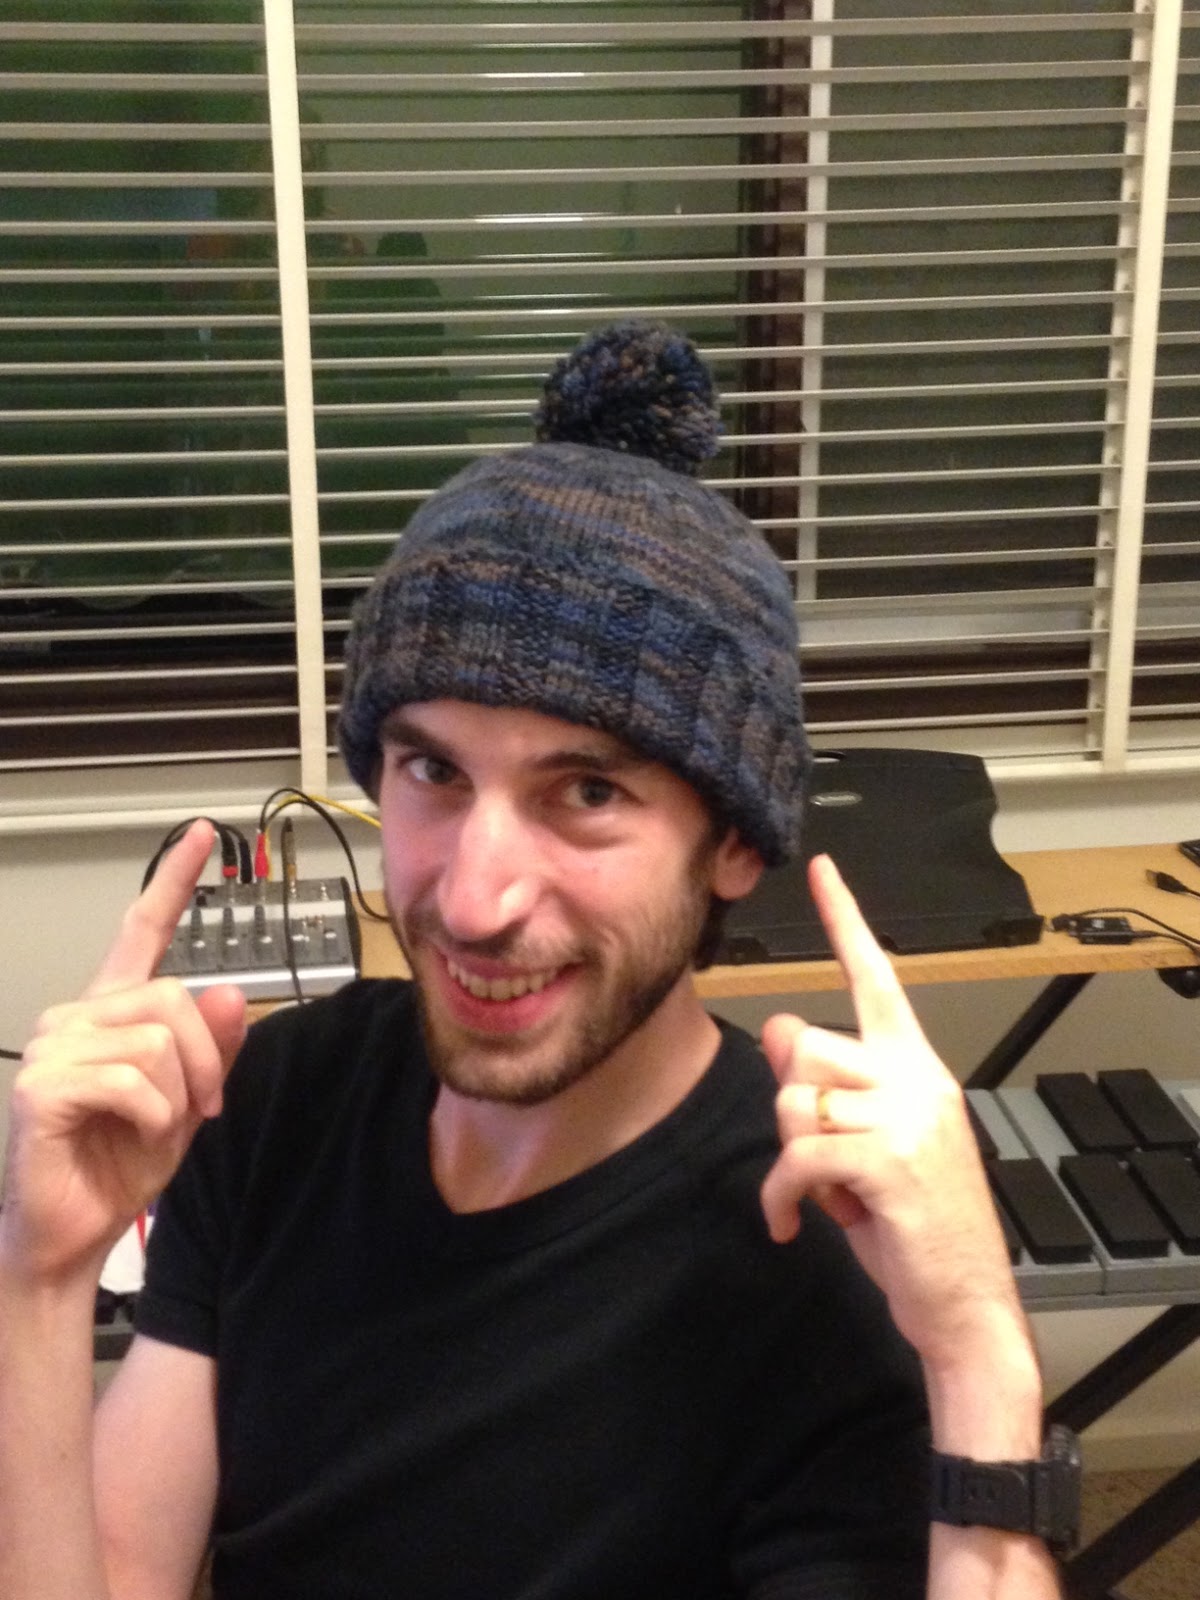
I also knitted a cream coloured one for my mum, and then a nice dark blue one for Charles! I made Charles’ one bigger than the ladies’ ones so it was nice and comfy and roomy, and then I put a pompon on top! And now he loves it!
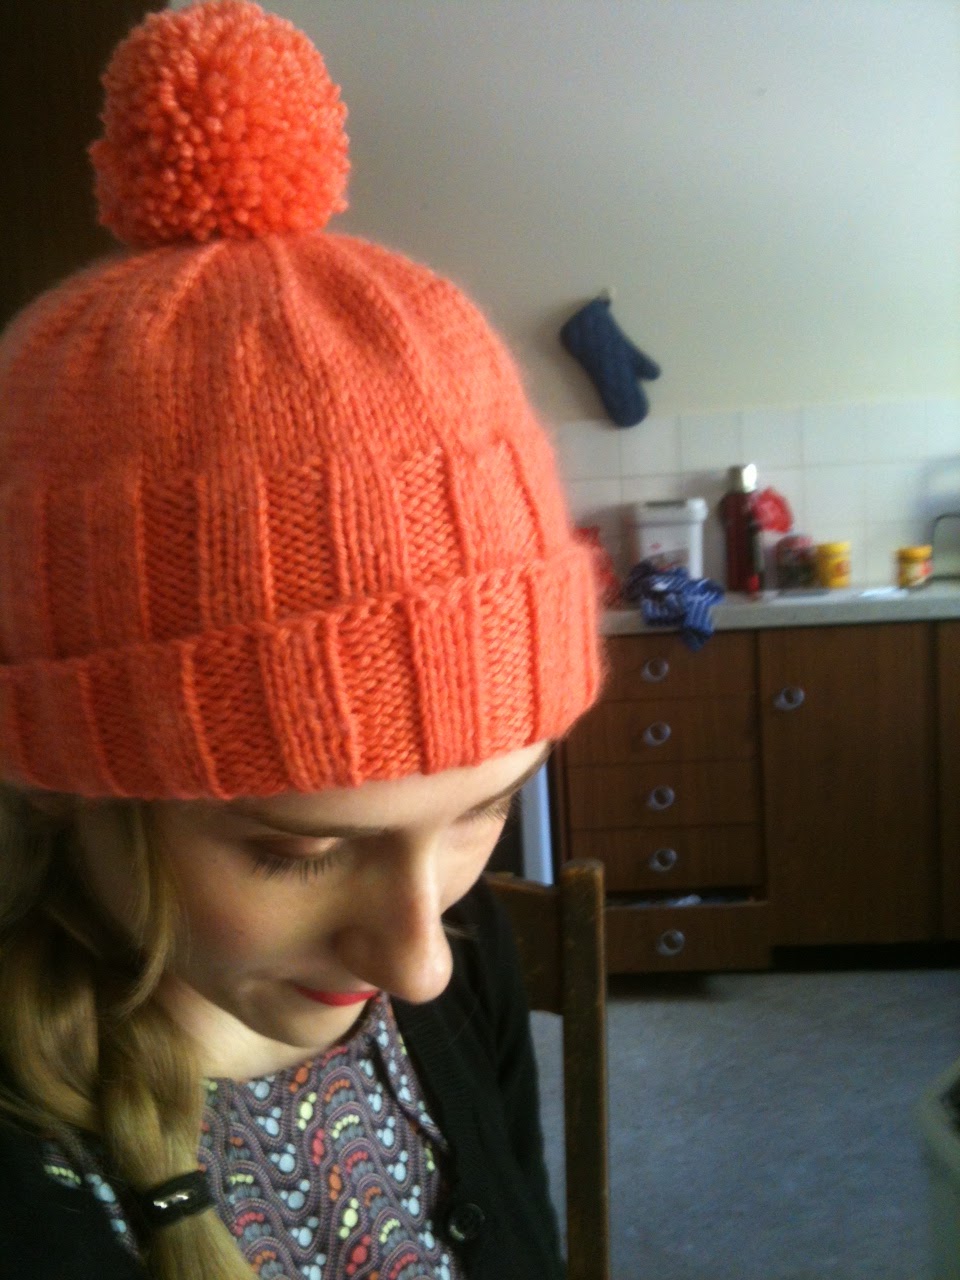
So here’s the pattern! It’s from the March 1973 edition of Stitchcraft (do they still make that?).
You’ll need some nice 8 ply (worsted weight) yarn (I used a bit less than 2 50g skeins), and some 3.25mm needles (UK size 10, or US size 3), and 4mm needles (UK size 8, or US size 6).
With the 3.25mm needles, CO 108 sts. Work 6.5 inches of k3, p3 rib, decreasing 3 sts evenly on last row: 105sts.
Change to 4mm needles and starting with a k row, work straight in stocking-stitch until hat measures 2 inches from top of ribbing.
Shape as follows:
1st row: k. 7, (k. 2 tog., k. 9) 8 times, k. 2 tog., k. 8. 96 sts.
2nd row and every alternate row: purl.
3rd row: (k. 6, k. 2 tog.) 12 times: 84 sts.
5th row: (k. 5, k. 2 tog.) 12 times: 72 sts.
7th row: (k. 4, k. 2 tog.) 12 times: 60 sts.
9th row: (k. 3, k. 2 tog.) 12 times: 48 sts.
11th row: (k. 2, k. 2 tog.) 12 times: 36 sts.
13th row: (k. 2, k. 2 tog.) 12 times: 24 sts.
15th row: (k. 2 tog.) 12 times: 12 sts.
17th row: (k. 3 tog.) 4 times: 4 sts.
Break yarn, thread through remaining sts, draw up tightly and fasten off.
To make up, press and join back seam with remaining yarn (I used a crochet hook). Fold ribbing in half to right side, or wear as desired. You can also make a pompon for extra cute.
To make Charles’ hat bigger, I cast on 12 extra stitches initially, so that at the end of the ribbing I had decreased 3 sts to 117. Then the shaping:
1st row: k. 9, (k. 2 tog., k 10) 8 times, k. 2 tog., k. 10. 108 sts.
3rd row: (k. 7, k. 2 tog.) 12 times: 96 sts.
5th row: as for 3rd row in above pattern.
7th row: as for 5th row.
So basically you extend the shaping by one row, but still decrease 12 sts each time. You could make it even bigger if you wanted! Sometimes I like to wear Charles’ hat because it’s so roomy and comfy, so you might want to just make a bigger one!
I hope this pattern is useful! It’s honestly a really great hat!

Matchy matchy!
